The ESP8266 is a low-cost Wi-Fi module, essentially a self-contained SoC (System on Chip) with integrated TCP/IP protocol stack that can provide full access to a Wi-Fi network. Basically, it is the fundamental building block to any connected device, integrating it into what is currently known as IoT (Internet of Things).
There is a growing interest in the field of home automation, which will eventually require that all electronic devices and even appliances in the home be able to communicate, with the user and among each other. Several protocols are currently being discussed among manufacturers, looking to have a unified “language” for the devices to speak, besides infrastructure, security, etc.
In any case, all starts with the device being able to connect to a Wi-Fi network, which eventually will grant access to the home and the world. A few years ago, a company named Espressif launched the ESP8266 chip, a Wi-Fi capable SoC that captured the interest of those looking to add Wi-Fi connectivity to any device, in a very simple, reliable and cheap way. The chip was later mounted into a compact module, an external memory was added, and now we have plenty of configurations to choose from, starting with the cheapest ESP-01, with just the essential pins available and integrated antenna, to the more complete ESP-14 (as of April 2016). The ESP-01 is the perfect starting point for anyone looking to enter the world of connectivity, so this document will describe step-by-step how to start working with this module.
Getting the hardware
First, get an ESP8266 module. In this case, as mentioned before, we will be using the cheapest version, the ESP8266-01 (Figure 1).
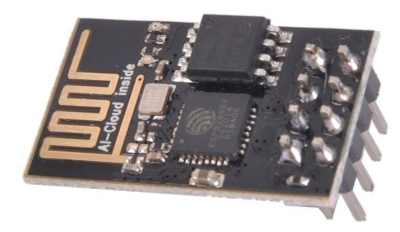 FIGURE 1.- ESP8266-01
Just eight pins are exposed outside the board in the included connector. The arrangement of these pins is not breadboard-friendly, since the two rows are too close to fit on both sides of the middle groove. While it is not difficult to create a simple adapter, I will show a better alternative to connect the module. While this configuration only has eight pins, they are more than enough to start working with this device. Figure 2 shows the function of each pin.
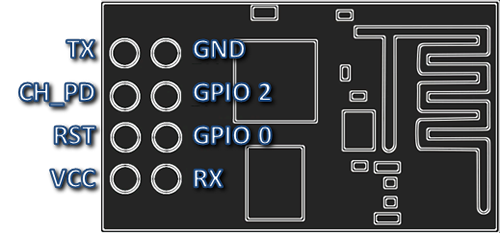
FIGURE 2.- Pin description of the ESP-01 board
In order to connect the unit to a PC, program it and test your programs, it is recommended to use something called “USB to TTL serial cable”. This device connects on one end to any USB port in your PC, and in the other end it has four wires: +V, TX, RX, and GND. A couple of considerations are in order:
1. - Make sure that the TX and RX terminals work with 3.3 V signals. Anything above that will damage the ESP module. The power terminal, +V, may be 3.3 V or 5.0 V, this will be discussed later.
2. - The USB device should work properly with your Windows version; there are some older devices that will not work with Windows 8 or 10, so look for at least Windows 8 compatibility if you are running the newest versions (as of April 2016).
There are other alternatives to connect the ESP to a PC, but I prefer this one due to its simplicity. Besides, the USB to TTL adapter can be used for other tasks, such as re-flashing other devices’ firmware (e.g. routers).
The adapter I will be using is called PL2303TA USB to TTL RS232 Converter Serial Adapter Cable. There are several versions available, always make sure it is based on the PL2303TA chipset made by Prolific so it will work with the newest Windows versions. Mine looks like Figure 3.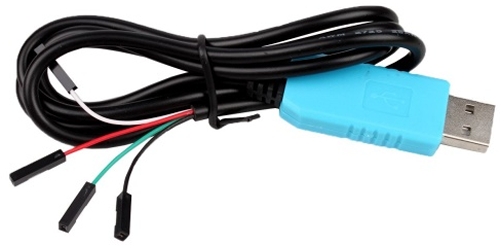
FIGURE 3.- PL2303TA USB to TTL RS232 serial adapter cable
The color codes of the wires are:
RED: +5 V
GREEN: TX (from the PC side, this will be connected to the ESP RX)
WHITE: RX (from the PC side, this will be connected to the ESP TX)
BLACK: GND (ground)
As you may have already noticed, the power terminal carries 5 V, deadly for the ESP. Be very careful to NEVER connect this pin to the ESP module directly!
Now you may connect the ESP to the TX, RX and GND terminals, and procure a 3.3 V power source. However, I would recommend building a simple adapter board, which will not only provide the proper voltage to the ESP but also expose the ESP terminals in a more user-friendly way, giving you access to the ports (GPIO 0 and GPIO 2) and the reset pin, besides simplifying the process of firmware update (by moving a jumper) and showing the ports status in a visual way, by adding two LEDs.
Building the adapter board
Figure 4 shows the schematic diagram of the adapter board.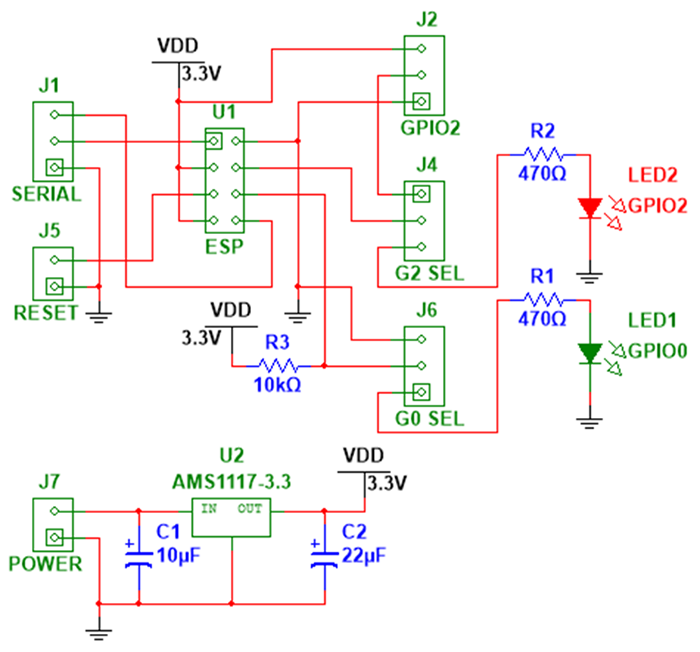
FIGURE 4.- Adapter board schematic diagram
The connector named SERIAL will be connected to the USB to TTL cable pins, from top to bottom GREEN (TX), WHITE (RX) and BLACK (GND). The RED (+5 V) wire is connected to the POWER terminal, upper pin. The board contains a 3.3 V, 1 A regulator, so the ESP will work at the desired level, even if the input fluctuates. In fact this circuit can receive voltages as high as 15 V, as described in the AMS1117 documentation, but it is advised not to apply this high level for a prolonged period of time, in order to guarantee the device specifications. In the low side, this circuit may accept 4.5 V, so operation with 3 AA or AAA batteries is possible.
Why is there a separated POWER connector, instead of adding the +5 V pin to the SERIAL connector? Since this board, once the ESP is programmed, can work as a standalone device, completely disconnected from a PC (e.g. once the Wi-Fi connection is set), it will only need the power supply to run. Therefore, the POWER connector has been included for a clean setup in an independent configuration.
The G0 SEL terminal lets you select between GPIO 0 mode (showing the status by LED1) and Firmware Update mode, just by moving a jumper (connecting the middle to the lower pin will connect GPIO 0 to LED 1).
The G2 SEL terminal is used to connect LED2 to GPIO 2 or making the port available to an external device (e.g. a relay). Connecting the middle to the upper pin will send GPIO 2 signals to another connector, named GPIO2, which includes 3.3 V and GND pins, to fully drive an external device.
Please note that, while GPIO 0 does not have a fully dedicated connector (that includes power pins), you can always connect the port to an external device by using the middle pin of G0 SEL connector.
The RESET connector, when shorted (connected to GND), resets the ESP.
Finally, the ESP has its own socket, the 8-pin connector named ESP, so you can plug and unplug all your ESP8266-01 modules every time you need to upgrade, program or even test them. This board may be even used as part of your finished project, adding wireless communications for a true IoT connected device.
The board layout is shown in Figures 5 through 7. The artwork is available in the Download section.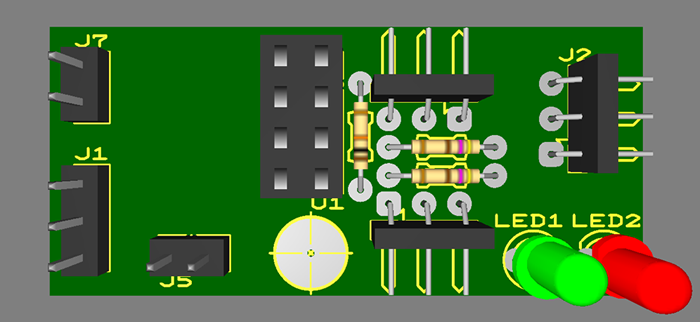
FIGURE 5.- Adapter board, components side (populated)
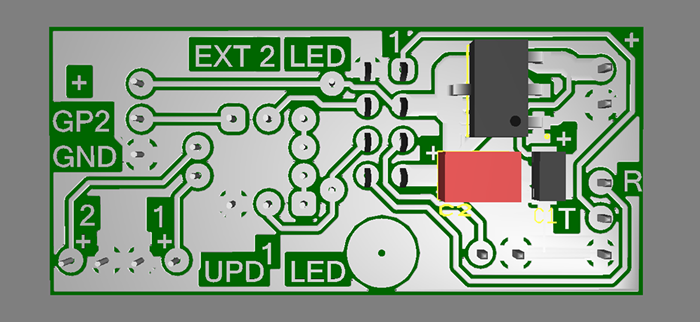
FIGURE 6.- Adapter board, copper side (populated)
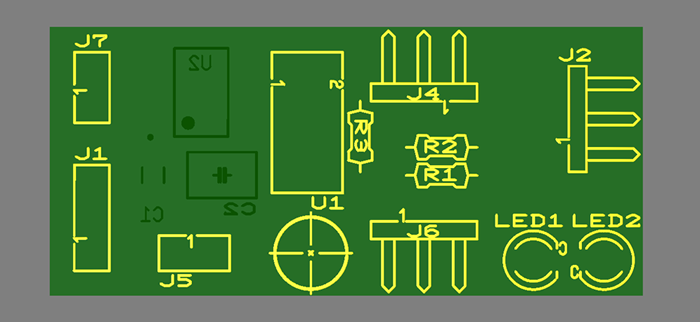
FIGURE 7.- Adapter board, components side silkscreen (not populated)
The finished board, with the ESP and USB to TTL cable connected, should look like Figure 8.
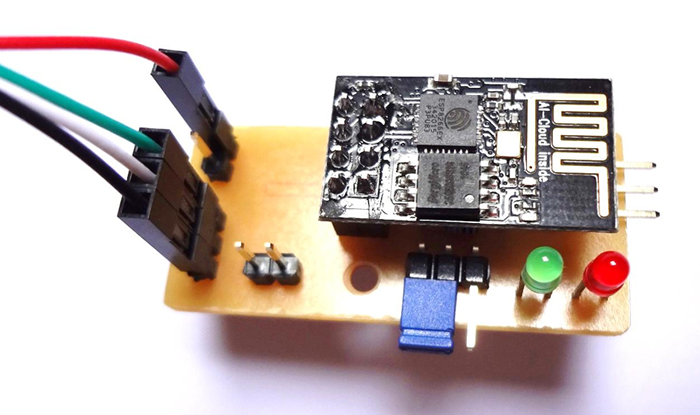
FIGURE 8.- Adapter board with the ESP module mounted in its socket, and the USB adapter cables connected
Connecting to the ESP
The first thing to do is make sure that the USB to TTL cable is recognized by Windows. The familiar sound when a USB device is connected should play, and then, only the first time, windows should start looking for the best available driver. Windows 10 does this automatically; you may have to experiment with your version.
In the Device Manager option (in Control Panel) you can see all devices currently in use. When the adapter is properly installed, it should appear under Ports (COM & LPT) as Prolific USB-to-Serial Comm Port (COM3). The COM assignment may be different in your PC (COM4, COM5, etc.), but you must remember to which port it has been assigned since you will need this information later to access the adapter.
In order to access the ESP, a couple of programs will be used. For firmware update purposes, i.e. re-flashing the ESP, we will use the NodeMCU Flasher, called ESP8266Flasher.exe, located here: https://github.com/nodemcu/nodemcu-flasher (as of April 2016). Select and download the appropriate release version for your Windows environment (Win32 or Win64). Once the proper firmware version is installed, another program, called ESPlorer.jar, will be used to upload the programs we create. As can be guessed by the file extension, this program requires the latest version of Java to run. The program can be downloaded from here: http://esp8266.ru/esplorer/ (as of April 2016).
Flashing the ESP
The module comes with some firmware already installed (may vary by vendor), and can be accessed using AT commands. We will be using a much more user-friendly environment, created using Lua, called NodeMCU. Therefore, the ESP needs to be re-flashed with this new environment. An interesting point is that currently the NodeMCU developers let you choose which modules to include in the package, so you can optimize the memory usage by selecting the modules you will actually use: http://nodemcu-build.com/ (as of April 2016). Just go there, put the email address where you would like to receive the firmware, select “Master” and choose the modules you will most likely use. Less modules means less memory used, though you will have less functions available… you decide. Some basic (and fundamental) modules are already selected for you; keep them. You may leave the miscellaneous options unselected (unless you need them, of course). Click the “Start your build” button; you will receive a build-status update in your mailbox within a few minutes.
The firmware download links will be sent right after the status message, and you will see that there are 2 bin files: one says “float” and the other “integer”. This indicates if the firmware can handle floating point numbers or just integers. Unless you really need floating point operations, use the integer version, to save resources. In any case, just download both and save them in a known location; you may decide to use the other version in the future.
Now you can proceed to flash the ESP. Follow these steps:
1. - Connect the ESP to the PC via the adapter board and the USB to TTL cable as shown in Figure 9; remember to position the G0 SEL jumper so GPIO 0 is connected to ground before plugging to the PC.
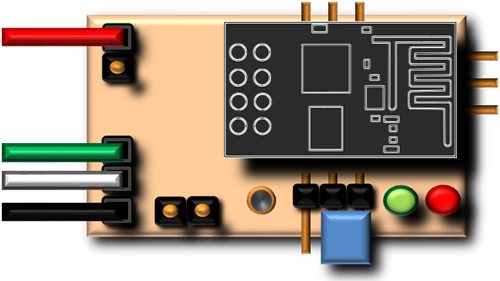
FIGURE 9.- Adapter board connections; the jumper in G0 SEL (blue) is now connecting GPIO 0 to GND
2. - Run the program ESP8266Flasher.exe. This is the initial screen (Figure 10); make sure that the right COM port is selected.
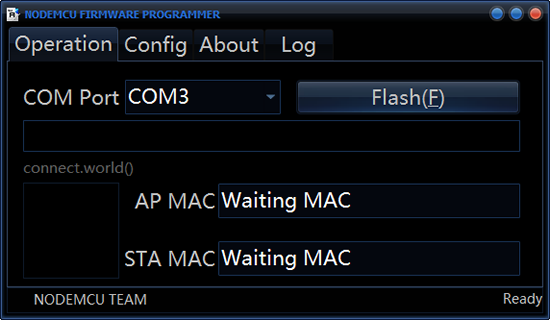
FIGURE 10.- ESP8266Flasher.exe, initial screen. Make sure to select the right COM port
3. - Under the “Config” tab, load the firmware you have just downloaded in the first slot (where it says “INTERNAL://NODEMCU”).
4. - Go back to the “Operation” screen and press the “Flash” button. The process will take a few seconds; the MAC values will be populated during the process (Figure 11). The blue LED in the ESP board will blink while the communication is active.
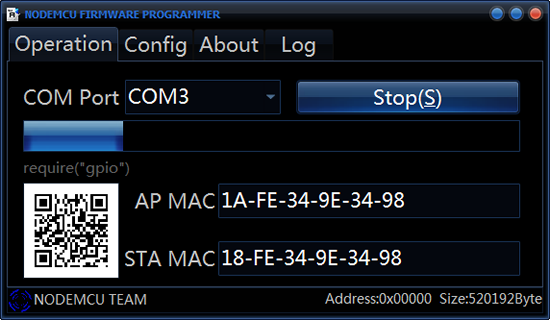
FIGURE 11.- Firmware update in progress
5. - After you receive the OK confirmation (green circle on the lower left corner, Figure 12), close the program, disconnect the USB adapter and you are done! Now remember to remove the jumper from G0 SEL, releasing GPIO 0 from ground.
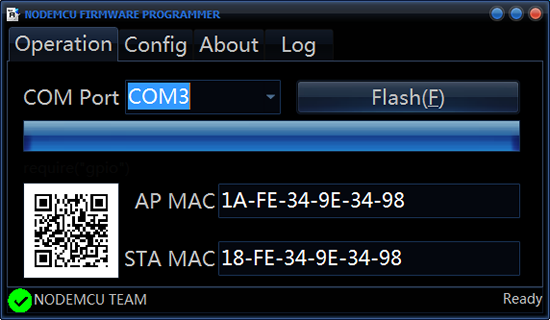
FIGURE 12.- Firmware update completed
Programming the ESP
Now you are ready for the fun part. Once you released GPIO 0 from ground, reconnect the USB adapter to the PC. Now, run the ESPlorer.jar program (Figure 13).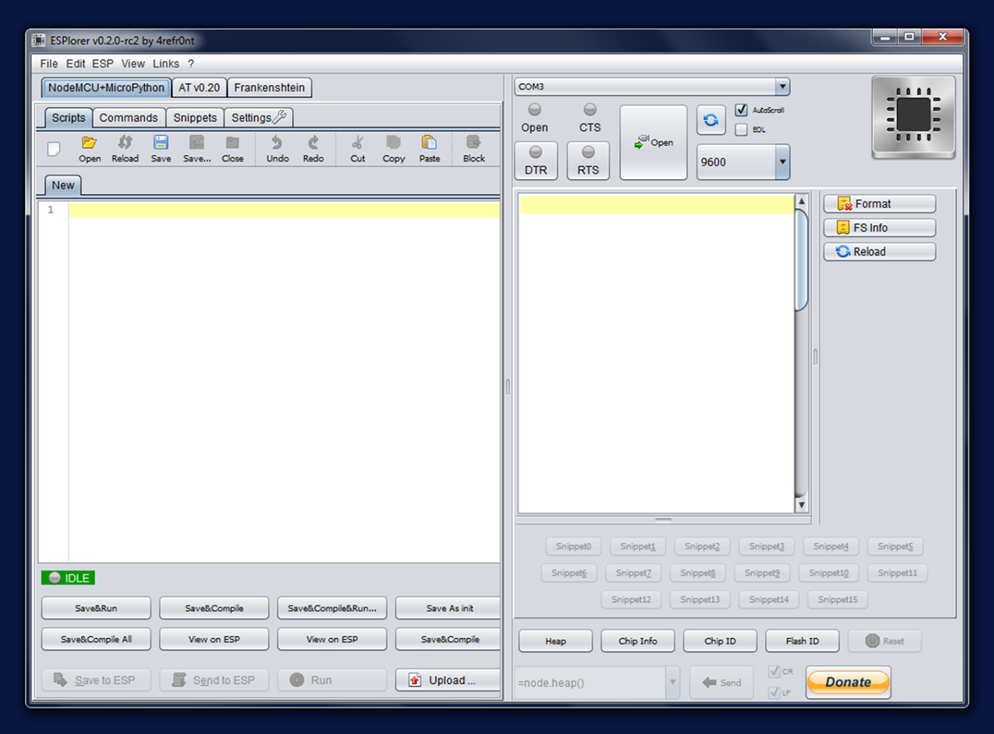
FIGURE 13.- ESPlorer working environment
Select the right COM port (same as before) and the connection speed (9600). Click the “Open” button and you will receive some message from the ESP, like:
PORT OPEN 9600
Communication with MCU...
Got answer! AutoDetect firmware...
Can't autodetect firmware, because proper answer not received.
>
Great! You are connected.
To test the connection, just write a simple Lua script in the left window:
print (“Hello World”)
Click the “Save to ESP” button on the lower left; the program will open a window to have the program saved on your PC first. Put any name you want (I named it Hello World.lua), click OK and then it will start sending the program to the ESP. After uploading the program, it will run, as indicated by the command dofile(“Hello World.lua”);... see below:
> file.remove("Hello World.lua");
> file.open("Hello World.lua","w+");
> w = file.writeline
> w([[print ("Hello World")]]);
> file.close();
> dofile("Hello World.lua");
Hello World
>
Success! You can see that the ESP returned the string Hello World after running the program.
For details on how to use all the functions of the ESPlorer program please refer to the developers’ page, where they include the link to a comprehensive tutorial (http://esp8266.ru/esplorer/).
Standalone operation
Let’s see the adapter board functionality, testing the standalone operation of the ESP. Position both jumpers, G0 SEL and G2 SEL, so the GPIO ports are connected to the corresponding LEDs (Figure 14).
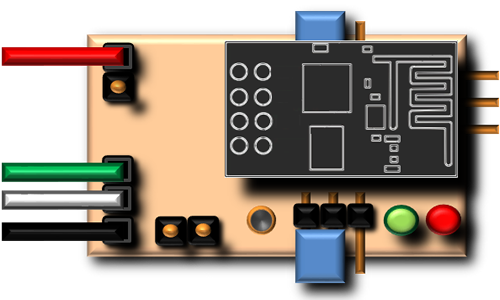
FIGURE 14.- Jumpers positioned to connect the GPIO ports to the LEDs
Replace the previous program with this one:
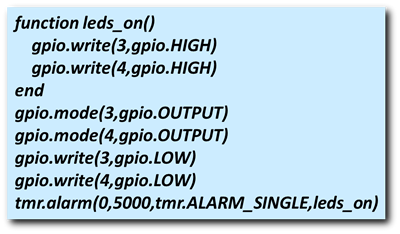 (
(Upload and run. Both LEDs will turn off, and after 5 seconds they will turn on; this is a very simple way to check that your program is running and the ports are responding correctly.
What if you would like to run this program independently, disconnected from the PC and the USB adapter? First of all, rename your file to init.lua (this is the default file that runs when the power is applied). Upload to the ESP. Now you can close the communication with the ESPlorer and disconnect the USB adapter.
Connect the adapter board (with the ESP module) to a 5 V power supply (use the 2-terminal POWER connector, Figure 15). The LEDs will turn on after 5 seconds, demonstrating that the program is running as expected, in a standalone configuration.
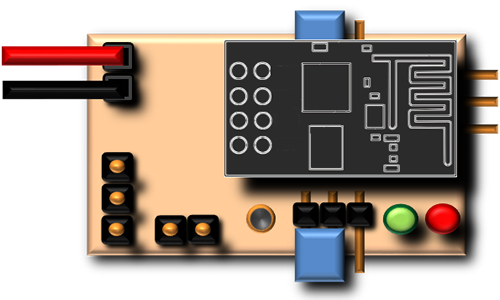
FIGURE 15.- ESP in standalone configuration
Now you have all the tools and initial knowledge to start programming the ESP8266. The NodeMCU environment is based in Lua 5.14; you may find the complete language reference here: http://www.lua.org/manual/5.1/ (as of April 2016). The web is filled with examples and the community of people using the ESP8266 is continuously growing, so start experimenting and in no time you will have your first connected device, the starting point for an IoT setup.
In future tutorials I will show how to use the ESP Wi-Fi features, the true value of this powerful device.
Appendix A: Bill Of Materials (BOM)
Here is the list of the components required to build the adapter board. As mentioned before, the artwork is available in the Download section.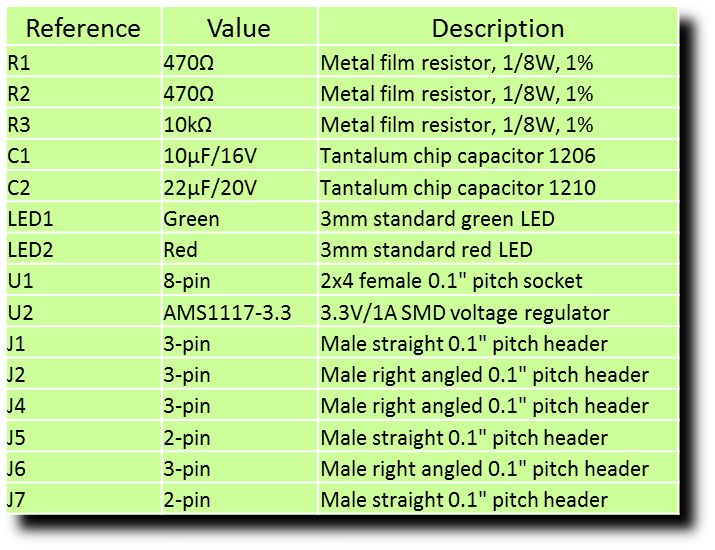
Please note that there is no “J3” in the design, so there is no reference missing here.
The LEDs used are the standard type, with Vf close to 1.7 V; if you plan to use higher Vf LEDs, such as blue or white, you may consider using lower R1 and R2 values, e.g. 330 Ω. Always try to use the larger R value possible that still delivers good LED luminosity, since a large current draw from the GPIO ports upon startup may create erratic behaviors. This is particularly true for GPIO 2, since it starts at high level, and the ESP may not boot properly if the port is tied low, or at least sourcing significant current. The symptom may be the blue LED on the ESP board to remain always on upon startup, and no communication being possible with the module. If that happens, try disconnecting the GPIO 2 LED by removing the jumper on the adapter board when the power is applied.